Installation
URLs to use
To connect an LG webOS for Signage-screen you must provide a URL to the server or cloud service. See the below tables for correct URLs and then follow the instructions provided.
Make sure to only use SI Server Settings as instructed. If you have configured "Play via URL" by mistake, make sure to disable it or it will interfere with the screens startup.
| Cloud Services | ||
|---|---|---|
| Service | Orientation | URL |
| Europe (EU) | Landscape/Portrait | https://eu.smartsigncloud.com/go/reg/lg.zip |
| Australia (AU) | Landscape/Portrait | https://au.smartsigncloud.com/go/reg/lg.zip |
Replace <server> in the URL’s with the name or IP-address of your server or cloud service. If using a name it must be a fully qualified domain name (FQDN), not just a hostname.
| Additional URLs and On-Premise | ||
|---|---|---|
| Name | Description | URL |
| webOS 4.0 – 6.1 | Landscape/Portrait (native) | http://<server>/go/reg/lg.zip |
* If you have configured https on your server and have a valid
certificate you can replace http with https to enable encryption.
* Smartsign versions before 10.3 used different URL’s depending on the
webOS version. Those URL’s are still valid and there is no need to
change them if you have existing screens.
LG webOS 4.0 - 9.0 (2017-2025)
Landscape orientation
The PM Mode (Settings -> General -> PM Mode) should be set to the default which is Power Off.
Other settings may cause instability/erratic behaviour.
- Power on the screen and wait until it starts up completely
- Verify that the time and date is set correctly (SETTINGS → GENERAL → TIME & DATE)
- Press the SETTINGS button on your remote controller, or click the button on the Smart Home Screen.
- On the “Ez Setting”-menu, select the SI SERVER SETTING option.
- After accessing the server settings, the following option are
displayed on the screen.
- Fully Qualified Domain Name: Enable this option and enter the URL address as listed above.
- Application Launch Mode: Set to Local
- Application Type: Set to ZIP
- Local Application Upgrade: Select Remote and press OK.
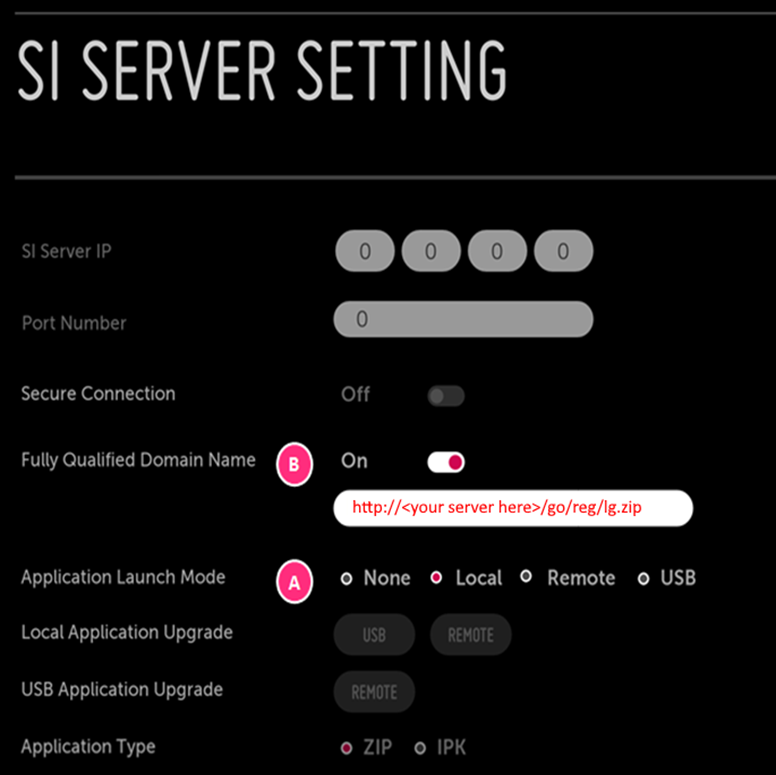
- An Application Upgrade dialog will appear, select Confirm and press OK.
- Wait for the upgrade to complete and then press OK.
- If the upgrade fails, recheck the settings and try again.
- Power OFF
- Power ON
- The panel will start and load Smartsign. It usually takes 15-25 seconds and it’s normal for the screen to show “No signal” during startup.
- If the upgrade fails, recheck the settings and try again.
- Power OFF
- Power ON
- The panel will start and load Smartsign. It usually takes 15-25 seconds and it’s normal for the screen to show “No signal” during startup.
Portrait orientation
The PM Mode (Settings -> General -> PM Mode) should be set to the default which is Power Off.
Other settings may cause instability/erratic behaviour.
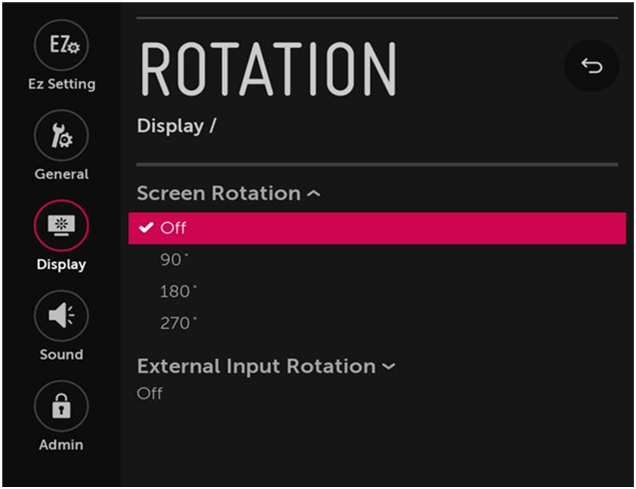
Important! You should not set OSD rotation or any other rotation setting in the screen unless specifically instructed to do so below.
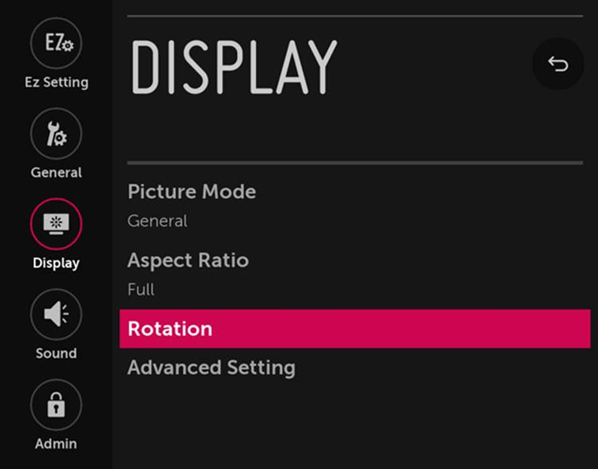
- Perform steps 1 – 7 of the Landscape orientation instructions
- Go back or press the settings button.
- Go to Display and select “Rotation”
- Screen Rotation should be set to 90 with very few exceptions.
(Check LG operation manual for correct installation orientation!)
- Power Off
- Power On
- The panel will start and load Smartsign. It usually takes 15-25 seconds and it’s normal for the screen to show “No signal” during reboot.